curriculum breakdown

-
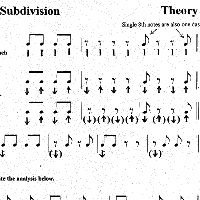 Theory Pages - Students are to follow the procedures set forth in the examples.
First, write the dashes, dots or numbers, then, drop them down to arrows or
letters. Also, remember to put parentheses around all rests. It is suggested
that the first three exercises be assigned to the students as homework. When
graded, if the student receives 100%, he/she passes out of that level. If the
student does not, he/she is to take the director's corrections home, and try
again doing # 4, 5 & 6. If the student still can not complete the assigned
exercises correctly, he/she should receive individual tutoring before trying to
complete #7, 8, & 9. Directors also have the "Blank Page" option. This is where
they can add their own counting system of choice to the examples on the theory
pages as well as the "Say" pages. These pages will then be inserted into their
own personal copies of whatever Rhythm Masters books are ordered for your school
or school system.
Theory Pages - Students are to follow the procedures set forth in the examples.
First, write the dashes, dots or numbers, then, drop them down to arrows or
letters. Also, remember to put parentheses around all rests. It is suggested
that the first three exercises be assigned to the students as homework. When
graded, if the student receives 100%, he/she passes out of that level. If the
student does not, he/she is to take the director's corrections home, and try
again doing # 4, 5 & 6. If the student still can not complete the assigned
exercises correctly, he/she should receive individual tutoring before trying to
complete #7, 8, & 9. Directors also have the "Blank Page" option. This is where
they can add their own counting system of choice to the examples on the theory
pages as well as the "Say" pages. These pages will then be inserted into their
own personal copies of whatever Rhythm Masters books are ordered for your school
or school system.
-
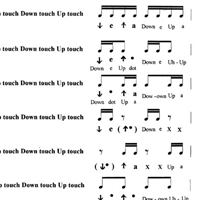 "Down Clap" and "Down touch Up touch" Drills - This allows the students to
actively feel subdivision as it relates to pulse In the initial stages, the act
of involving the full body, not just the foot, helps create a dependency on
using subdivision in order to count rhythms correctly. As the students become
more skilled through practice, the need for full body involvement becomes less
essential. Eventually, the foot alone will be able to take on the role of
establishing both the pulse and subdivision when counting rhythms.
"Down Clap" and "Down touch Up touch" Drills - This allows the students to
actively feel subdivision as it relates to pulse In the initial stages, the act
of involving the full body, not just the foot, helps create a dependency on
using subdivision in order to count rhythms correctly. As the students become
more skilled through practice, the need for full body involvement becomes less
essential. Eventually, the foot alone will be able to take on the role of
establishing both the pulse and subdivision when counting rhythms.
-
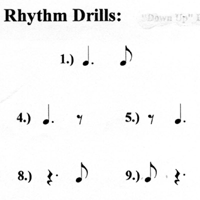
Rhythm Vocabulary
Usage A: Write out these rhythms on the board prior to class. Establish a steady tempo and select one of the rhythms on the board and point to it. The students are to tap their foot and, in time, say aloud the correct counting. Remain on the same rhythm exercise until the full class is correctly counting it. The director then moves on by pointing to a different rhythm exercise on the board, and the students then begin to count out the new rhythm selected. This acts as a quick review of the rhythms in sections B & C later in the same chapter.
 Usage B: The students read the exercise in the book. After
establishing a steady tempo, the director selects one of the exercises and holds
up the appropriate number of fingers. He then calls out "one, two, ready, begin"
and the students will begin counting the selected rhythm aloud. After the class
is counting the first selected rhythm correctly, the director holds up a
different number of fingers to indicate the new rhythm to be counted. He then
calls out "one, two, ready, change" and, when the students hear this, they are
to look up at the conductor to see to which rhythm to change. This helps develop
the skill of looking up at the director and then back at the music.
Usage B: The students read the exercise in the book. After
establishing a steady tempo, the director selects one of the exercises and holds
up the appropriate number of fingers. He then calls out "one, two, ready, begin"
and the students will begin counting the selected rhythm aloud. After the class
is counting the first selected rhythm correctly, the director holds up a
different number of fingers to indicate the new rhythm to be counted. He then
calls out "one, two, ready, change" and, when the students hear this, they are
to look up at the conductor to see to which rhythm to change. This helps develop
the skill of looking up at the director and then back at the music.
-
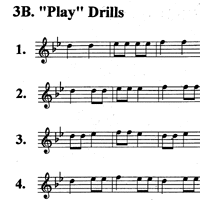
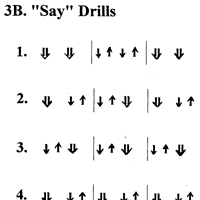 Say" and "Play" Drills - After establishing the tempo the director wishes
to use, the students will first say the counting out loud reading the left page,
and then play the same rhythm on their instrument, reading the right page. Both
pages will normally end with a half note, followed by a half rest, allowing the
students time to bring their instrument up to playing position, as well as back
down to their laps for the "Say" portion of this drill. Once the rhythms in this
chapter have been analyzed and rehearsed by saying and playing them, fold the
left page back so only the "Play" page is showing. Re-establish a similar tempo
used in the first drill, and this time have the students play the rhythms
straight down the page reading music only. This drill will improve your students
"rhythm vocabulary" in the same way a student first learning to read evolves
from a "phonics" to a "whole language" recognition of words in learning to read.
For any rhythms causing difficulties, go back to the previous page and review
the problem rhythms by saying the counting first. Re-demonstrate the written
analysis on the board if needed.
Say" and "Play" Drills - After establishing the tempo the director wishes
to use, the students will first say the counting out loud reading the left page,
and then play the same rhythm on their instrument, reading the right page. Both
pages will normally end with a half note, followed by a half rest, allowing the
students time to bring their instrument up to playing position, as well as back
down to their laps for the "Say" portion of this drill. Once the rhythms in this
chapter have been analyzed and rehearsed by saying and playing them, fold the
left page back so only the "Play" page is showing. Re-establish a similar tempo
used in the first drill, and this time have the students play the rhythms
straight down the page reading music only. This drill will improve your students
"rhythm vocabulary" in the same way a student first learning to read evolves
from a "phonics" to a "whole language" recognition of words in learning to read.
For any rhythms causing difficulties, go back to the previous page and review
the problem rhythms by saying the counting first. Re-demonstrate the written
analysis on the board if needed.
-
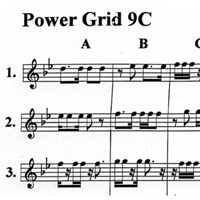 Power Grids - The "Power Grid" is designed to give your students the
opportunity to fully demonstrate their reading skills by playing the new rhythms
learned in the present chapter in a totally random order. In this way, the
students cannot get "comfortable" with what it sounds like through drill
repetition, and are forced to really read the music presented to them. The
"Power Grids" also are a great quick evaluation tool to test or quiz your
students on their reading ability. The grids should be played in the following
order: Day 1, lines #1 - 8; Day 2, columns A - H; Day 3, repeat the process if
neccessary, or even use this opportunity to teach retrograde motion . When your
students seem to have mastered the rhythms learned in that chapter, move on to
sections D or E or the next chapter. If your students are having difficulty with
playing the "Power Grid", go back to the "Play Drills" or the "Say and Play
Drills" and work your way back up again.
Power Grids - The "Power Grid" is designed to give your students the
opportunity to fully demonstrate their reading skills by playing the new rhythms
learned in the present chapter in a totally random order. In this way, the
students cannot get "comfortable" with what it sounds like through drill
repetition, and are forced to really read the music presented to them. The
"Power Grids" also are a great quick evaluation tool to test or quiz your
students on their reading ability. The grids should be played in the following
order: Day 1, lines #1 - 8; Day 2, columns A - H; Day 3, repeat the process if
neccessary, or even use this opportunity to teach retrograde motion . When your
students seem to have mastered the rhythms learned in that chapter, move on to
sections D or E or the next chapter. If your students are having difficulty with
playing the "Power Grid", go back to the "Play Drills" or the "Say and Play
Drills" and work your way back up again.
-
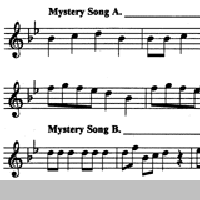 Song Reinforces - These may be out of range of your first year players
due to the additional notes used, but it is great for review the second year.
You could offer these exercises for extra credit for your more advanced students
to help motivate them to practice the skill of looking up and learning new note
fingerings. The first three songs are titled for your students. The last two or
three are "Mystery Songs". The idea is for your students to use the rhythms
learned earlier in that chapter, and apply them in order to solve the secret
identity of each mystery song. The director may even give a "pop quiz", asking
the students to write down the names of mystery songs A, B, & C.
Song Reinforces - These may be out of range of your first year players
due to the additional notes used, but it is great for review the second year.
You could offer these exercises for extra credit for your more advanced students
to help motivate them to practice the skill of looking up and learning new note
fingerings. The first three songs are titled for your students. The last two or
three are "Mystery Songs". The idea is for your students to use the rhythms
learned earlier in that chapter, and apply them in order to solve the secret
identity of each mystery song. The director may even give a "pop quiz", asking
the students to write down the names of mystery songs A, B, & C.
-
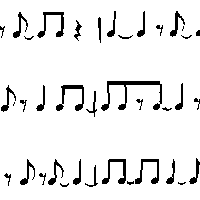 Challenge Drills - Most students today are totally dependent upon the
standard beaming of the pulse in order to read rhythms accurately. We still
occasionally run into musicthat is not beamed in a standard fashion (for
whatever the reason), which will initially baffle most performers, and yes, even
some of us band directors. The concept being, if a student can read music that
is purposely miss-beamed, then they can read ANYTHING!!!! at that level. Use
these drills for second year review, or as extra credit studies with your first
year students.
Challenge Drills - Most students today are totally dependent upon the
standard beaming of the pulse in order to read rhythms accurately. We still
occasionally run into musicthat is not beamed in a standard fashion (for
whatever the reason), which will initially baffle most performers, and yes, even
some of us band directors. The concept being, if a student can read music that
is purposely miss-beamed, then they can read ANYTHING!!!! at that level. Use
these drills for second year review, or as extra credit studies with your first
year students.
- "Quest For The Rhythm Master" - This is a fun way to evaluate the degree of your students understanding of counting, and to reward your more advanced and hard working students. This section can also be used as an evaluation tool for testing, or to set up some kind of progression or music "check off" system if you wish. See the detailed description and instructions at the end of both books.
- General Curriculum - "Rhythm Masters" is designed as a comprehensive two to three year program to gradually progress your students, in accurately analyzing and playing rhythms, ALL RHYTHMS!!!! You can pick and choose the chapters you wish to cover, as well as, the order in which you present them to your students. All sections, and the exercises included in them can be introduced and performed in only 3 to 5 minutes. Do not dwell on these exercises; review, perform and evaluate. As your students play through an exercise, circle or make notes on any rhythms they are having difficulty with. Then, start off the next class by reviewing measures first, then, either replay the same exercise, move on to the next step, or, going back to the previous exercise. This gradual and incremental approach, combined with the continuity of daily drill, and ability to accommodate even the shortest of student attention spans, WILL GET RESULTS!!!
In Book I, you should concentrate on sections A, B, & C. You can utilize sections
D & E, when they occur, to challenge your advanced students in the form of extra
credit. Before starting Book II, take time to review the rhythms in the first
book by going over select chapters starting with section C. Then use sections
D & E to reinforce and push your students beyond the regular standards at each
level. As always, for any problems occurring with "Power Grids", go back to the
B section, or even A, and work your way back up the progression.